Spring Break!

by Rita Wetzel of RitasCreationsOnETSY

What is the history of Spring Break? How did it come into existence? And how do we Etsians in Minneosta honor it?

Some say Spring Break originated way back in the days of ancient Greece with traditions of honoring the wine gods as spring made its appearance. Some say it started in the 1930's when a Maine swim team went to Fort Lauderdale. This annual trek eventually grew into the College Coaches' Swim Forum over the years attracting as many as 300 swimmers. Swimmers plus the neighboring military plus some beer - well, what more can be said? Over the decades, Spring Break has come to mean a break from school and college and homework, a trip to warm weather with family or fellow students, partying (especially if parents aren't along), as well as a signal to winter's end!

In Minnesota, we especially look forward to Spring Break time because it means the snow and cold is once again fading into spring rains and eventually flowers and warm weather. One season is ending and another one is unfolding! And us Etsians here at HandmadeMN have our own unique way of honoring Spring Break too!!

PenguinPlace heads to the time honored Spring Break destination of Fort Lauderdale to enjoy the beach, the warmth, the palm trees, and the blue, sunny skies!

ChoosingBeauty honors Spring Break at the sea!


XOHandworks treks to the ocean to see the Green Sea Turtles!!


Pickleberries makes sure she has her Caribbean Garden Millefiori Pony Tailholders packed before she takes off on her Spring Break vacation to warm weather!

Unfortunately though, Chickadeesigns isn't going away for Spring Break this year. However, she is still doing the happy dance because she has this "not in school" waterproof resin necklace to remind her that there is no school, there is no homework, and that she has a week of creative time instead!
So what are your plans for Spring Break 2011?

HandmadeMN Giveaway - All Things * Jane

By Michelle of Evie's Tool Emporium

Congratulations to our latest giveaway winner! Thanks to all who entered and we wish you good luck with this week's giveaway!

This week Lisa of all things jane is giving away this cute travel earring organizer.

Travel earring organizer

This cute earring holder is the perfect solution for the earring-wearing traveler.

The interior fabric features a loose weave so your earrings easily poke through, without leaving obvious holes behind. The panels are padded and fold neatly into the pocket, which is then secured by twisting the ribbon around the button. It works well with all types of earrings: posts, hoops, or hinges.

Organizer measures 5" W x 3.25" H when closed. Inner piece measures 3" W x 7.25" H when laid flat.

How to Enter:

Visit Lisa's shop, pick your favorite item and leave a comment on this post about it.

Open to US residents and international residents.

Please make sure we have a way to contact you!

For Bonus Entries:
Please leave each in a separate comment, as each comment is an entry (To qualify for extra entries you must do step one above).

1. Visit other HandmadeMN team members shops (listed in the sidebar here) and leave a comment(s) here with your favorite pieces.

2. Blog about this giveaway with a visible link back to this posting and comment here with a link to your post.

3. Tweet about this giveaway and leave a comment(s) with a link to your tweet(s).

4. Follow our blog (you want to do this anyway to learn about upcoming giveaways!). Leave a comment here letting us know you are a follower. If you are already a follower, leave a comment anyway, as each comment is an entry.

5. Follow HandmadeMN on Twitter. Comment back here with your Twitter link. Existing followers just leave your Twitter link here.

6. Become a HandmadeMN Facebook Fan. Comment back here with your Facebook name. Existing fans just leave your Facebook name here.

7. Follow Lisa's blog all things-jane. Leave a comment here letting us know you are a follower.

8. Follow allthingsjane on Twitter. Comment back here with your Twitter link. Existing followers just leave your Twitter link here.

Contest ends Saturday, March 12th, at 12:00 noon Central. One winner will be chosen by Random.org.

Good luck!
HandmadeMN members are not eligible to win.

Spirit of Spring

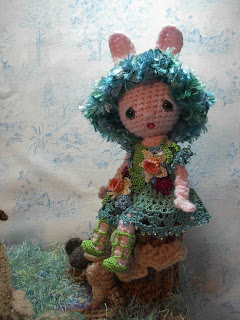
I was inspired by 60F weather, the thawing of ice, and this womans wonderful crochet jewelry to create a Spirit of Spring.  Most of North America and Europe have suffered from a brutal winter; so it is time for this Spirit to heal our hearts.

The meadow scene is one I made last year, about this time.  The dear little owl on the stump is from a free pattern on the Roman Sock blog by Brigitte Read; patterns for the rest of the scene are available here on my blog.

I've never been a big bunny fan, but bunny ears seemed appropriate for a Spring Spirit :-)  They are crocheted directly to her head:
Bunny ears:  Ch11, dc in the back loop of the third ch from the hook, dc in the back loops of each ch to the last two chains, hdc in the back loop of the last two chains, sl st to the head, turn, sl st in the first st, sc in each dc up to the top of the ear, three sc in the turning ch at the top, and sc in the remaining ch on the opposite side back to the begining, with a sl st in the last ch.  Fasten off and leave a long tail to neaten up the ears where they attach to the head.

For her hair, I used Yarn Bee 'Elvish' (appropriate!) from Hobby Lobby.  I must say, it is a bugger to work with; you can't really see the stitches, you have to feel them.  But, being an eyelash yarn, mistakes are well hidden.  I worked the wig cap for several rounds, then tried it on her head to see where I would need to work openings for her ears.  For the ear openings, ch3, skip three sts, sc in the next three, ch3, skip three stitches, sc the rest of the way around.  Work one or two more rounds, then a final round of (ch7, sl st in the next) 10 times, then (ch15, sl st in the next) the rest of the way around.

Her dress is from a lace pattern, worked in two shades of blue/green, with the final round beaded with fringe beads.  The top of the skirt is gathered up with 42 stitches, then a simple bodice is crocheted from spring green.   Size 11 seed beads were used on parts of the flowers and at the waist and neckline of the dress.  The flower patterns were from different sources, but mostly from 'Crochet Bouquet,' a great book of crochet flowers and leaves.


 She is wearing Elven Boots crocheted from size 8 perle cotton.  With a slight modification (in the pattern) they can become Mary Janes.

Today we have four inches of snow, but the Spirit of Spring is here!

Fun Friday Finds ~ Tweet Tweet

By Jenna Halek ~ Artistic Edition

Tweet Tweet
 
(Click on the image to go to the Etsy Treasury!)

Visit these HandmadeMN shops to see more:
Click on any of the names below
First Row (Left to Right):
sparkflight, hungrydogdesigns, RiyahLiDesigns, Twistmo
Third Row (Left to Right): ljbe, greensquirrel, MaryLittfin, cayennepeppy

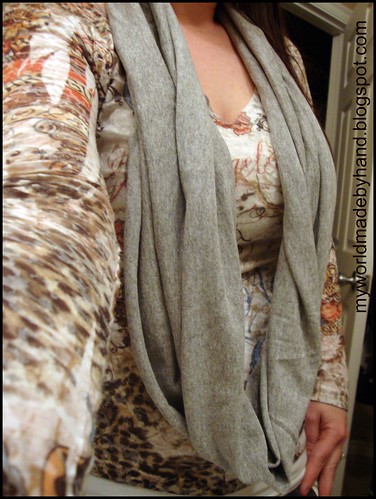
No Sew Infitiy Scarf {tutorial}

Oh boy...how I love easy peasy cheapy projects...SO much fun!

onme

You'll need:


  XL or XXL t-shirt
**I used an XL 53% polyester, 47% cotton blend T**
Pair of scissors
How to:


1. Lay t-shirt out


2. Cut along bottom edge - be sure to remove all seams.


3. Cut under armpits


4. Now...
STRETCH...
stretch...
STRETCH...
and stretch. 

Be sure to make a funny face or a cheesy grin while stretching!


And last but not least...wear it like the diva you truly are!

All this runway style for $3.99! 

I'm in LOVE with this one!


Cleaning a Microwave with Lemon Juice {how to}

BeAnS
BeAnS
ThE   mAgIcAl   FrUiT
ThE   lOnGeR   tHeY   CoO
ThE   mOrE   tHeY   tOoT!


However will I clean this mess up?!?

{{sigh}}
{{double sigh}}

Ah HAH!

Where's my lemon juice?!?

Recipe:

Glass of water
3 tbsp. of Lemon Juice
Washcloth
and a few minutes of time

How to:

1 ~ Put 4 tbsp. of lemon juice in 2 cups of water in a microwaveable dish
2 ~ Heat in microwave for about 3 minutes
3 ~ Let sit in microwave for another 2-3 minutes
4 ~ Dip washcloth in water
WARNING: Water may still be HOT! HOT! HOT!
5 ~ Wipe those nasty beans away....


Voila...sparkling clean microwave with a lemony after smell!

Note ~ I've been doing this for years but recently saw a similar post on Fresh Nest Design

How to: Paper Banner Tutorial

by Laurel of laurelleecreativity

Here is a simple how-to, for a great decoration idea for any room, event, or party!

Here are all the supplies you will need:
-Paper(i used old hymn sheets), sissors, hot glue gun, glue, ruler, piece of card stock(4in by 5.5in), fabric, string(yarn or twine)


1. Using your piece of card stock, mark a line in the middle and draw straight lines down to each opposite corner.

2.Cut out triangle. This will be your pattern for the flags

3. Trace triangle onto your choice of paper and cut out (you can trace more than one piece at a time)

4. Glue 2 triangles back to back. String twine between pages before gluing.

5. Cut out desired shapes or letters out of clothe and using glue gun, glue them onto each flag

Get creative, there are so many elements you can bring into this project :)

HandmadeMN Giveaway - Twistmo

By Jessica of Clay By Clay

Congratulations to our latest giveaway winner! Thanks to all who entered and we wish you good luck with this week's giveaway!

This week Lori Lee of Twistmo is giving away your choice of vinyl wall art.    


The winner of this giveaway can choose any one vinyl wall Art or Words listed in Lori Lee's shop (but not a custom item).  As a self-employed graphic artist, Lori Lee finds working in this new vinyl medium just plain fun!  She says "To create a design and see it gigantic on a wall is a rush I can't explain."  If you're looking for a fun new way to add a TWIST to your home decor, vinyl wall words and art is a quick and easy way to do it.  It can be applied to any clean, dry, smooth surface, not JUST walls.  Apply it to appliances, cabinets, windows, electronics, and more.  Lasts for years indoors or out, yet it will remove cleanly without leaving any gunk. Great for temporary residence or even public spaces.  Although this giveaway is for an existing item from Twistmo, Lori Lee also designs custom vinyl art.

Open to US and International residents.

How to Enter:

Visit Twistmo and pick your favorite item and leave a comment on this post about it. (Scroll to bottom of post and click on Comments)

Please make sure we have a way to contact you!

For Bonus Entries:

Please leave each in a separate comment, as each comment is an entry (To qualify for extra entries you must do step one above).

1. Visit other HandmadeMN team members shops (listed in the sidebar here) and leave a comment(s) here with your favorite pieces.

2. Blog about this giveaway with a visible link back to this posting and comment here with a link to your post.

3. Tweet about this giveaway and leave a comment(s) with a link to your tweet(s).

4. Follow our blog (you want to do this anyway to learn about upcoming giveaways!). Leave a comment here letting us know you are a follower. If you are already a follower, leave a comment anyway, as each comment is an entry.

5. Follow HandmadeMN on Twitter. Comment back here with your Twitter link. Existing followers just leave your Twitter link here.

6. Become a Facebook Fan of HandmadeMN. Comment back here with your Facebook name. Existing fans just leave your Facebook name here.

7.   Become a Facebook Fan of Twistmo.  Comment back here with your Facebook name.  Existing fans just leave your Facebook name here.

Contest ends Saturday, March 5, 2011 at 12:00 noon Central. One winner will be chosen by Random.org.

Good luck!

HandmadeMN members are not eligible to win.

Make-Up Brush Jar {tutorial}

I've been seeing a ton of make-up organization tutes lately 
so I thought it might be a good idea to take a look at
what my my make-up organizing looked like...


{{sigh}}

Not too happy with what I saw...
you can see that I at least tried to organize it all with a
kitchen drawer thingy majingy!

So...I thought I would start with something simple...the Brushes!

Perty cute eh?!?


All I needed was:

 ~ Make-up brushes {{of course}}
 ~ Some pebbles
 ~ And a jar

And I'm betting you can guess how I did it?!? 

1 ~ Open the jar...phew...that was hard!
2 ~ Cut open the bag holding the pebbles...this is getting tougher and tougher!
3 ~ Pour the pebbles into the jar...now this is really important...only fill the jar halfway (keep the rest of the pebbles for another org project)...everyone still with me?  Teehee...I'm just teasin' y'all!
4 ~ Leave as is, or cut a phrase out with your Cricut (or whatever diecutting machine you have) on vinyl, center phrase on jar, and tie a ribbon!


 Now I must get to the rest of that make-up {{double sigh}}


Fun Friday Finds ~ Mustard

By Jenna Halek ~ Artistic Edition
Mustard
(Click on the image to enlarge)

Visit these HandmadeMN shops to see more:
Click on any of the names below
First Row (Left to Right): fromoutofthecracks, FoxglovePhoto, STELLAandHODGE, greensquirrel
Second Row (Left to Right): pinswithfury, Omooreart, Trigo, JulieMeyer
Fourth Row (Left to Right): appleberryink, FennelStudio, FreshStash, choosingbeauty

DIY Pendants from Paper & Washers - Version 1 {tutorial}


You'll need:

Paper, paper, paper!!!
When searching for your paper think '2 inches'...that's all your going to use.  Get paper that fits your style...your wardrobe.  And just keep in mind...no matter what you pick...these pendants are going to be ONE OF A KIND!

Three tips:

1. Metallic/shiny paper doesn't work that well

2. Paper textured with velvet and/or felt won't work either.

3.You don't have to limit yourself to scrapbook paper.  Wrapping paper works as well

TRUST ME ~ I've tried all three!

I'm going to make one (or two) pendants from each of the papers shown here.  As you can see, I've chosen a wide variety of papers...some of very whimsical and some are pretty straight forward.  You'll soon realize that anything goes...and the
possibilities are literally ENDLESS!


You'll also need:

Washers
2" Circle Punch or a pencil and a pair of small scissor
Mod Podge (LOVE this stuff)
Sponge brush to apply Modge Podge
EnviroTex Lite pour-on high gloss finish
Plastic cup and spoon (not shown)
Bails (shown below)
Jewelry glue (shown below)


Instructions:


1. Punch your paper.  I punch the paper with the punch upside down so I can see exactly what the pendant will look like.


Note - the washers are exactly 2" in diameter.  There are two different washers this size.  One has a smaller center hole and the other has a larger center hole.  Both will work but I prefer to use the washers with the smaller center hole (for this version).

Here are the six pendants I will be making.


2. Mod Podge the top of the washer - lightly. 

Note ~ Do the pendants one at a time.


3. Put paper on washer while Mod Podge is wet.  Press down.  Spread a very light layer of Mod Podge over the top of the paper.


4. Wait for Mod Podge to dry completely.  I give it about 15 minutes just to be safe.

5. Cover a cookie sheet with tin foil and place your pendants on it.  Do the next steps on the tin foil. This will help protect your counter/table/workspace from the EnviroTex in case you spill which I do every time!


6. Now comes the EnviroTex.  You must measure out an equal part of each liquid.  I have found that if I measure out a capful of each I can get about 10-12 pendants done.  Pour each capful in a paper/plastic cup and mix with a plastic spoon. 


DO NOT USE YOUR REGULAR DISHES... THIS WILL RUIN THE DISH YOU USE!


7. Spoon/scoop small amounts of the mixture on to each pendant (again, do one at a time).  Spread the mixture around until there is an even coating.  I usually have a work lamp over my space so I can see better.

8.  Once the EnviroTex is spread lightly blow on the pendant.  This will pop any bubbles that form.


9.  Wait to dry.  This will take 24-48 hours (another reason why I put them on the cookie sheet...much easier to move around if needed).

 
10.  Attach bail to the back of pendant with Jewelry Metal Glue and let dry.  I let these dry for 24 hours. 

 
And there you have it...easy, inexpensive one-of-a-kind pendants! 
The hardest part is just waiting for the stuff to dry!

Do you knit?

If you do, you are in luck!  I found this book in our public library and instantly fell in love with Fiona's dolls.  So much so, that I had to purchase her book (from Amazon ) even though I cannot knit a stitch :-)

There are nine dolls in all, ranging in size from just under 20 inches to just over 23  inches tall.  They have the most amazing faces, and you know how hard it is to create a pleasing face on crochet or knit fabric.  Fiona shows you a great way to do this, her instructions are simple and easy to follow.

The dolls have an extensive, removable wardrobe they can share (love that), cool hair, and great accessories.  What more can I say?

Oh yes, Fiona has a website, and has recently posted a free pattern for a 'chibi' girl; a petite knit girl that is way cute.  Check out  Fiona McDonald's blog here.

Normally I would say 'enjoy the crochet,' but instead I'll leave you with  'pick up those sticks!'